
How To Produce A Realistic Flame.
3D Computer Packages, No Matter How Good Always Have Difficulty Creating Natural Effects Max Is No Exception. But With A Little Trickery It Is Possible To Achieve Anything In Max. Thats Where The Real Art Comes In.
Heres The Max File Used In This Tutorial LIGHTER.ZIP - 27KB
This Tutorial Is Not Going To Explain How To Create The
Lighter Or Lighter Textures But Simply Deal With The Fire Effect.
First Load in The File Called "lighter.max"
In the top View Creat a Cylinder with 14 height segments which is
40 units high and with a radius of 4.Be Sure To CHeck The
'Generate Mapping Co-ords" Box.
then choose the move modifier
Goto tools and choose transform type in.
enter these values
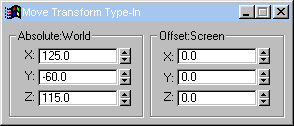
then goto the modifier Rollout And Click On Taper
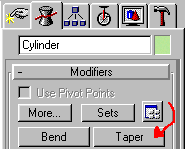
In The Taper Rollout Set The Curve to 1.25 then click
Sub-Object.
then in the left ViewPort Draw The Gizmo Downwards aproximatly
2/5ths of the way down the cylinder.
Then Go Back To The Taper Button
And Choose It Again.This Time Set The Curve to 1.0.this gives
us our basic flame shape.
Right Go Back To The Modifier List. And Choose Noise.(should Be
Just Under Taper).Set the Following Settings.
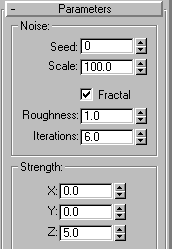
Then Click The Edit Stack Button
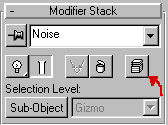
and choose collapse all.choose yes when asked.
this just frees up no longer need stack information. this is a
good tip to save memory .
Now Apply a Noise Modifier Again And Use The Following Settings.
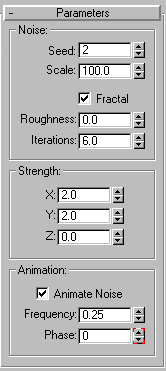
Make sure You Choose the Animated Noise Checkbox.
and thats the flame shape and animation created.
now we just have to design the texture.
Open Up The Material Editor and choose a empty slot.Under the
diffuse Map Choose a gradient.
Use The Following Settings.
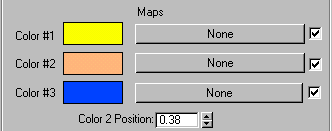
the colours are...
color #1=252,255,0
color #2=255,185,128
color #3=0,72,255
now choose the 'back to parent' button 
scroll the window down to the maps rollout ,open it if it isnt
open.
then drag the gradient map from diffuse to the Self-Illumination
Map.enter it and change the colours to
color #1 & #2=pure white
colour#3=pure black
Then goto the parent again and drag the self-Illumination Map Into The Opacity
Map.
Now Just Apply The Texture To The Cylinder.
To Finish Off I Added A Particle System And A Glow Effect.These
Can Be Examined By Choosing Unhide all (this releases the
particle System) viewing the glow in the video post.